Check Designer
If you use Church Windows Accounting to print your checks, you can then use the Check Designer button on the Print Checks screen to design the layout that corresponds to the check paper you use. 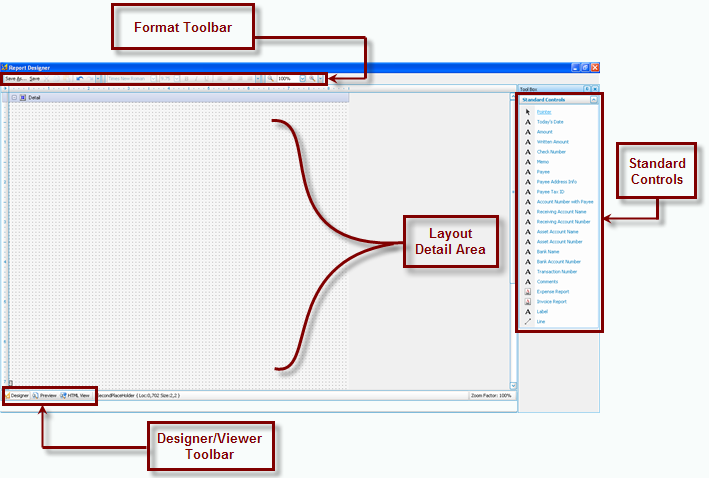
Use the Standard Controls toolbar on the right to choose the objects that you would like your checks to contain. Then add the object you chose to the Layout Detail Area, where you may click and drag the object to the desired position on the layout. You may make additional adjustments to the appearance and the alignment with the use of the buttons available on the Format Toolbar. Use the Designer / Viewer Toolbar to switch back and forth between the design layout and either a preview of what the design will look like, or even how the design will look on an HTML web page. These four areas of the Report Designer are discussed in further detail below:
 Format Toolbar
The Format Toolbar, found at the top of the screen, allows you to save your layout as is, save the layout under a different name of your choice, reposition and resize text and its font style, and zoom further in and further out from the items on the layout screen. Below is a more detailed description of each button shown on the toolbar, from left to right:


|
When viewing or making changes to your layout, you can click Save As to save it under a different Check Layout name. Note:
|

|
When viewing or making changes to your layout, you can click Save to save it under the same Check Layout name that you chose when you first opened the Report Designer. |

|
First, select your text, or any other object you wish. Then press this button to “cut” it. Your selection, though not presented on your screen anymore, is saved to the clipboard until you make it appear at another position on the layout, using the |

|
First, select your text, or any other object you wish. Then press this button to “copy” it. If will appear as if nothing has changed. However, the item you just “copied” has been saved to the clipboard for as many times as you wish to create a duplicate at another position on the layout, using the |

|
When pressed, the button will allow you to take any material or object and either create a duplicate for it, or make it appear in a different position. Usually, you will see this button light up on the toolbar after you have chosen either |

|
Undoes the last action that you made. If pressed repeatedly, it will undo every action that took place even more previously. |

|
You will see this button light up when you press the |
|
Select the letters or object on the layout. Then press the |

|
Select the letters or object on the layout. Then press the |

|
Select the letters or object on the layout. Then press this button in order to give a Bold appearance to the selection. |

|
Select the letters or object on the layout. Then press this button in order to give a slanted or italicized appearance to the selection. |

|
Select the letters or object on the layout. Then press this button in order to place a line under the selection. |

|
Select any lines or objects on the layout. Then press this button to adjust what you selected so that it all appears to be aligned along a left margin. |

|
Select any lines or objects on the layout. Then press this button to adjust what you selected so that it all appears to extend from a central margin. |

|
Select any lines or objects on the layout. Then press this button to adjust what you selected so that it all appears to be aligned along a right margin — contradictory to what the |

|
Select any lines or objects on the layout. Then press this button to adjust what you selected so that it all appears to be equally distributed along both left and right margins — similar to many textbooks. |
|
Use either |
 paste button described below.
 , or
, or  .
. Undo button. This will then allow you to redo the action.
 font button, in order to choose the typeface, or font style currently indicated.
 button does.
 and
and  , or the
Layout Detail Area
The largest portion of the Report Designer screen, as you can see from the image above, allows you to add objects to a layout and visualize how your checks will appear.
Note:
To move objects very precisely, you can hold down the CTRL key and use the arrow keys on your keyboard (←, ↑, →, or ↓) to move the object(s) very minutely. You can also hold the SHIFT key along with CTRL and the use arrow keys to either stretch or shrink the size of the object(s).
Standard Controls
The toolbar found on the right side of the screen allows you to choose what type of object you want to place on the Layout Detail area. Click any of the objects from the Standard Controls toolbar to place a line under it. Once the object has been underlined, it is active and ready for you to specify on what position it should appear on the layout.
Except for the  , the
, the  , and the
  , the objects described below are controls that will print information that varies from one printed check to the next.
Note:
When you first enter the screen, the  pointer object in the Standard Controls will appear as
  underlined. This is an example of what indicates the object as active and ready for you to use. And when you click a different item, that new item will then contain the line underneath it.
|
|
When activated, you may use the pointer to select or change the content of objects that have been already added to the layout. To select an object with the pointer, click it once. Otherwise, you may double-click the object to change its contents. |

|
The day on which the check is being printed. |

|
The numerical amount for which the check is written. |

|
The amount of the check written in words. |

|
Prints whatever Check Number is specified by the Print Checks screen. |

|
The Memo or Notes field on the check where you can write additional notations in regards to the check. |

|
The first and last name, organization name, or purpose of the recipient of the check that you are printing. |

|
The address, city, state, and zip code of the recipient of the check that you are printing. |

|
The applicable Tax ID that you have assigned to the recipient. |

|
The Chart of Accounts Account Number that is assigned to the recipient of the check. |

|
The Account Name of the recipient as it appears in the Chart of Accounts — sometimes it is the same as the Payee. |

|
The Account Number of the recipient as it appears in the Chart of Accounts — if you use account numbers. |

|
The Chart of Accounts Account Name of the Asset that the issue of the check affects. |

|
The Chart of Accounts Account Number of the Asset that the issuance of the check affects — if you use account numbers. |

|
The name of the bank listed under the Asset account used to generate the check. |

|
The account number associated with the bank listed under the Asset account used to generate the check. |

|
The Transaction Number on the Browse Transactions screen, under which the issuance of this check is recorded. |

|
The comment information associated with the check at the time the bill was paid. |

|
The Invoice Number, Chart of Accounts Account Name and Account Number (if applicable), and the dollar amount for each expense associated with the issuance of the check. At the bottom of the Expense Report, you will also find the Total Invoice Number and the Total Dollar Amount for the check. |

|
The Invoice Number and the Dollar Amount associated with the check to be written. |
|
|
Custom text that is printed on the check or its stub. You more than likely will be using a Label to appropriately represent each of the objects that you have placed on the layout. In addition, you can place a Label on the layout to show a sentence or paragraph that is applicable to all checks that will print using this Check Layout. |
|
|
A line that you can draw, which will either separate items, be drawn next to other lines, among other things custom to your desired result. |
Designer / Viewer Toolbar
- Click the Designer button
 to make any adjustments to the fields on the layout (as explained above).
 - Click the Preview button
 to view how the layout items would look if printed out.
Note:
The Preview will display the layout using demo data, not your Church's data.
